Let me remind you of the lovely table I started out with and accidentally ruined...

 |
| Good bye lovely patina! |
Oops. But it is very clean now. That's got to count for something on a dining table?
.JPG)
Time to bleach!
I was pretty concerned during the bleaching process. It looked very patchy. Some areas had crusty white flaky bits. Others appeared unchanged. I applied it so liberally that there were puddles! I thought I'd stuffed it completely up.
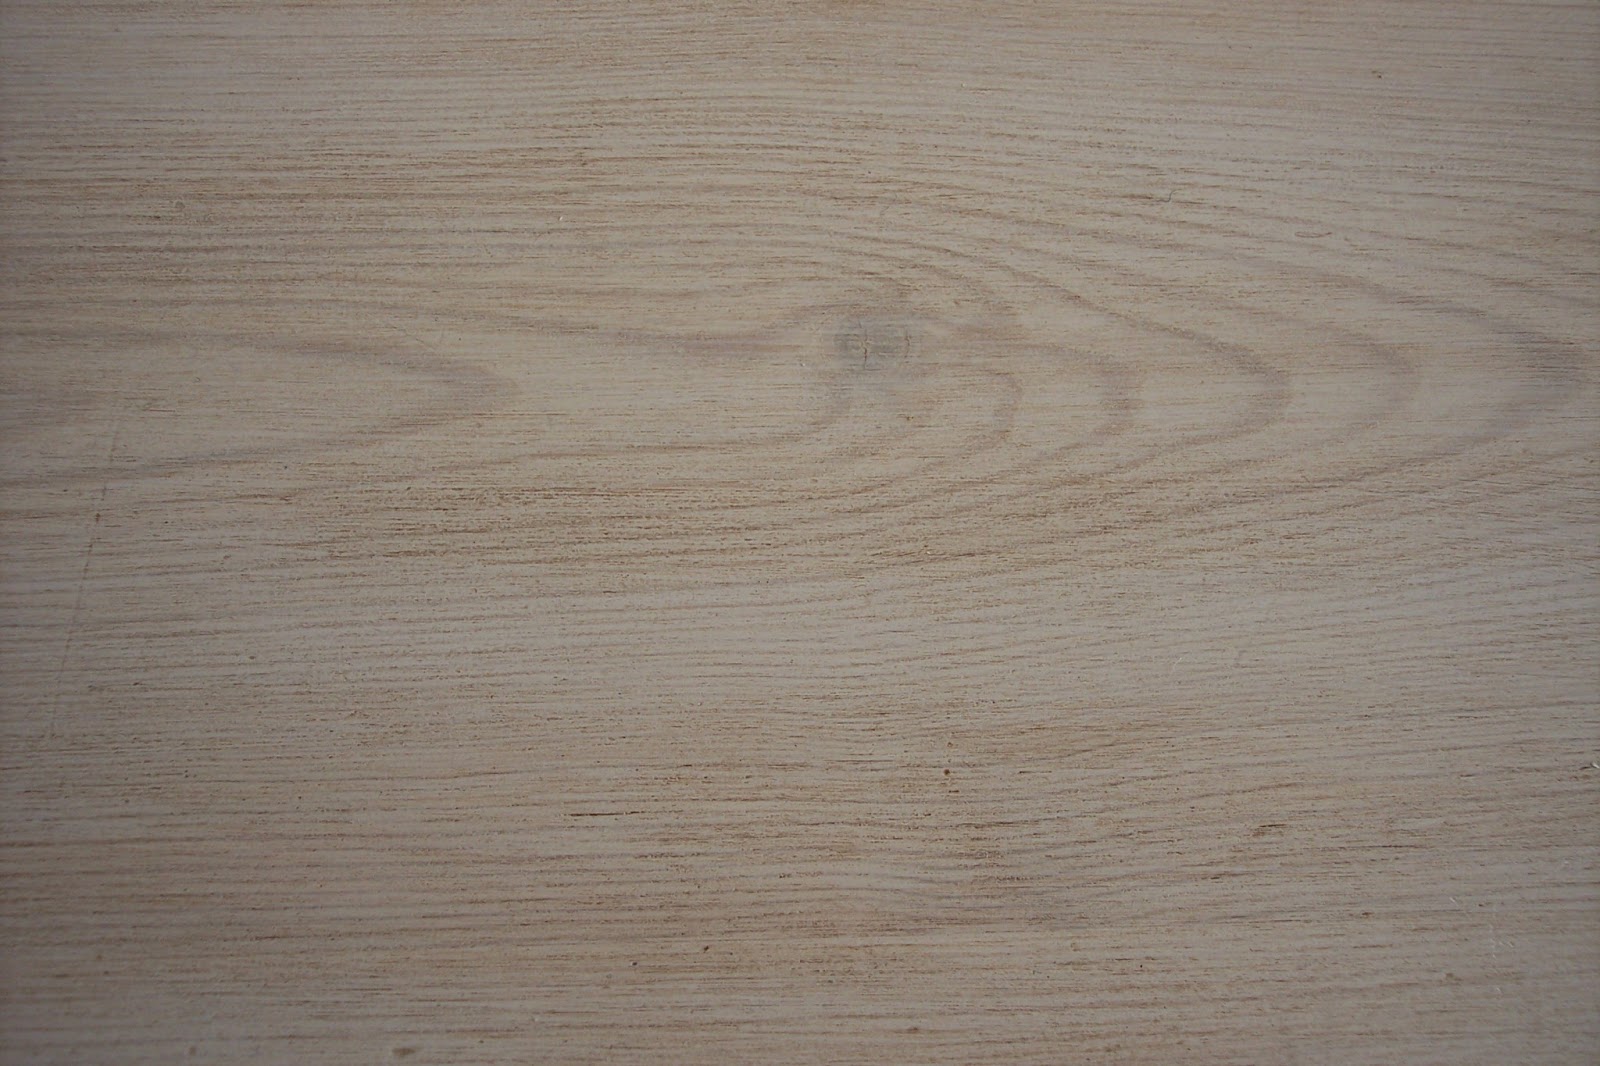
But after one treatment with a 2 part wood bleach...

Oh yeah! Much better! But you remember my experimentation on the oil smeared table leg?
After one treatment: oil can be seen...

 |
| (Top: 1 bleach treatment. Middle: left alone. Bottom: 2 treatments) |
So seeing as I'm an all or nothing kind of girl, I thought I'd do another bleach treatment on the top because any wax or varnish will darken it...( you have to wait 2 hours between treatments.)
To be honest, I couldn't see a huge difference after the second treatment. I then used my table leg test zone and applied clear wax on one area and clear varnish on another area. This was hugely dissapointing. Both of them darkened the pine and brought out the orange again.
I realised that in order to get the paleness I was after, I would have to use paint which is exactly what I thought I could do without, having used the bleach. I made up a wood wash of F&B Cornforth White and water and applied this. You have to do this in the direction of the grain and drag your brush from one side of the table to the other with no breaks. If you keep lifting your brush you get a patchiness that looks like a bad paint job rather than an old bleached table top.
After the paint wash had dried I was REALLY pleased!

and up close...

Next I had to make another decision. Wax or varnish. Wax looks best as the wood still looks like wood. But I used this on my last dining table and it didn't stand up to grease stains. It's just not relaxing to have people over for Sunday lunch and have to scream at them if they spill the gravy on the table. Varnish can look very plasticcy and can sometimes detract from the wood. But it offers far greater protection.
Here's what I use- both. First a very thin coat of water based matt varnish following the wood grain. Then an incredibly light sand and one more thin coat dragging the brush from one side of the table to the other again, without lifting. This gives you a flawless smooth finish with no patchiness but you've got to work fast as it dries fast! If you're wanting a pale finish, NEVER use oil based varnish as it's always more yellow and darkens further over time.
 |
| This is what I use. |
After the varnish dried I moved onto wax. I used the darkest wax I had. The table top was beautifully pale but also very new looking! I want it to look like an antique farmhouse table so it needed dark wax to add age and character. (All this obsessing with paleness and now DARK wax? Trust me, it works!)
If you use a matt varnish and wax, the wood still looks very much like wood. The matt varnish takes the wax beautifully. It gives you great protection against spills. (I'll still have to use coasters and mats for hot things.)
I also gave it a sound thrashing, firstly with a lingerie bag filled with screws, then a lingerie bag filled with teaspoons. Just to stop this looking all perfect and new. Hopefully.
Blooming heck, this is an absurdly long process! And I'm not even onto the legs yet!
Want to see the completed table top? Is anyone still out there and reading this? Does anyone care?
Sooo, the whole process without dark wax...

and with dark wax...
...just a bit older looking.

Ta daa! So today I'm hoping to start on the legs. I want a crusty old finish. I'm not entirely sure of all the colours I need.
Come back and see the completed table soon. Hopefully!
P.S. I have not been paid by Ronseal or Rustins (the bleach) for this post. I just want to tell you the products I used.


That IS a lot of work - but look how lovely it is - well worth it right?
ReplyDeleteCan't wait to see the legs - but meanwhile I have to go back a post because I spied the most magnificent desk - OMG - I want it.......
XOXO
It was worth it as it's just the way I hoped it would be! I'm the most demanding and exacting client! xx
DeleteBlimey, Emma Kate, you are a perfectionist! All your hard work has paid off though, the table top looks great. In fact you've inspired me to do something with our computer desk which is a horrid shade of orange pine. xx
ReplyDeleteGo for it Loo! xx
DeleteCrikey what a lot of work, you really are a perfectionist aren't you? It looks fabulous though so all your grafting has been worthwhile and best of all YOU are pleased with it.
ReplyDeleteUnless I stuff up the legs in a monumental way, this will be our forever table so it's all worthwhile!
DeleteThis comment has been removed by a blog administrator.
ReplyDeleteGood grief you've been busy - how you've managed to get anything done in this heat amazes me. The table looks fab - so far - looking forward to seeing the rest x Jane
ReplyDeleteI'm obsessive! And NOTHING else gets done around here while I'm working on a project! x
DeleteYour tables looking fantastic so far, all your time and hard work has definitely paid off. Xx
ReplyDeleteThanks Nicci, xx
Deletewow! Looking good.
ReplyDeleteI was inspired to whip the tablecloth off my pine kitchen table and pour Domestos on a patch of it. It slightly bleached it but the place where I spilled a vase of water over it was more bleached... cloth has gone back on for now. Looking forward to the table legs pics ♥
Ah, I think wood bleach works better than domestos! But I've used that on my vintage breadboards with great results!
DeleteSo glad that you've managed to get it looking like you want it to - it's such a lovely table. Looking forward to seeing it when the legs are done.
ReplyDeleteThanks Scarlet!
DeleteMadam, you are the reason my pine furniture looks like it has chicken pox! ( all knots smothered in Zinser!) your table looks amazing, I'm so glad you share and keep us inspired : ) x
ReplyDeleteYou're tackling the orange pine then? Yay! Take photos! Hope it goes smoothly! At least it's good weather for paint to dry! x
DeleteWow, such patience - I wish I was more like that! Definitely worth the effort and what a finishing touch that dark wax makes. So do you think you will paint the table legs? What a transformation - also I've learnt a lot I didn't know in the process! x
ReplyDeleteThanks Antonia, I'm definitely painting the table legs but I did a test area with my colours and it sucks so it's back to the drawing board! x
DeleteYou're welcome Kathy. I used 2 very thin coats of matt acrylic varnish. You could use more but then the wood starts looking plasticcy. If you don't want to use coasters at all you might want to try a polyeurathane varnish as these are the strongest, but they will also darken your wood and continue to do so. No good if you want your table this pale, but ok if you're not after a bleached out look. The wax was definitely not up to keeping off grease marks. Hope this helps.
ReplyDeleteI think it looks amazing.I'm not sure I would have had the patience that you had though!
ReplyDeleteThanks Anne.
DeleteYou work so diligently at this kind of thing, no wonder they want you for the telly! Well, that and the fact that you're drop dead gorgeous! The table looks really good, well done. But don't ever invite me for a meal, I always spill things, and I'd cry if you shouted at me! xxxxx
ReplyDeleteThank you Curtise. It was family I shouted at. So that makes it okay.
Delete;) xxxx
Your tables looking fantastic, thanks so much for detailing every step so carefully.Oak Bunk Beds
ReplyDeleteThank you!
DeleteHi
ReplyDeleteThat is so cute, I would of never thought of that. I am definitely making me one or maybe a few! Lol
Just re-reading this as I am doing our orange pine kitchen table....got a sander for Christmas! Two questions:
ReplyDeleteWhat wax did you use?
Have you tried Osmo products?
That's what I'll be using (an old tin of Hard Wax oil - now called Osmo Polyx Oil) simply because we've got some left over from using it on the floor of my shed years ago. I've also used it previously on an old pine table and I would say it is heat and liquid resistant, which is pretty much what Osmo claim. I believe it's been used on an airport floor in the past. It's expensive but a little goes a long way.
I'm going to try your idea of the wash of paint before I wax it. I notice that Osmo does another product now that gives a limewash look - I'd be trying that if I hadn't already got the leftover stuff.
I've never used Osmo, but like you, I've read good things about it. I think they do a white coloured oil that might give you a nice effect. Most clear wax should be fine but I used a Colron one once that was too greeny yellow, so not all clear waxes are the same. Perhaps try an inconspicuous area first? I used Liberon wax with turpentine. I always use their wax. Enjoy your new sander!
DeleteYou have really transformed an average looking table into something special. How is it wearing? WHat was the original finish on the table. I'd love to do something similar but my table has some sort of varnish or lacquer on it
ReplyDeleteThank you. The original finish was waxed . It's wearing beautifully. It has kept its paleness and is unmarked. If I'd have just varnished it, it would have darkened by now.
DeleteI sanded the table first which removed the wax surface. You'd need to do the same. Sanding should remove the wax or varnish, you shouldn't need to strip it.
Apologies if this appears twice, just lost the first draft! I've got a chest of drawers that is ugly orange pine and I've been investigating bleaching it so thanks for he instructions, really useful. When you sanded, did you do it by hand or with an electric sander? Thanks!
ReplyDeleteI used a belt sander. Hope that helps.
DeleteHi Emma,
ReplyDeleteI've just bought an oregon pine table and bench set which i want to place outside on our patio. I've requested to leave the set raw (untreated) as I want to follow your steps to get a more pale/organic look.
Do you have any advice on additional treatments or steps to take to make it suitable for outdoor use? I will be using a plastic cover while its not in use so it wont be exposed to the elements all the time.
Thanks
Hi, I think the bleach works best when the wood has darkened a bit with age. You can have a go with new wood but you won't have a dramatic change. Your best approach might be to use an outdoor wood treatment in a white or cream shade and water it down for a wood wash. Good luck!
DeleteHello Emma,
ReplyDeleteWhat wood bleach do you use? The table looks great! I'm hoping to bleach some pine dining chairs which are currently looking very yellow and would appreciate any pointers.
Thank you!
Tanya
(A new follower of your blog as of today)
Hi Tanya,
DeleteIt’s the two part Rustins wood bleach. Here’s the link...
http://paintedstyle.blogspot.co.uk/2013/07/experimenting-with-wood-bleach.html
It’s great fun!
Good luck with your chairs!
Emma
Hello, great result! Can I ask was the pine at the start of the project quite orangey? And did the stripper/bleach stade need sanding afterwards? :-)
ReplyDeleteYes it was quite orangey. After the bleaching, it did need a little sanding when it dried but not a huge amount.
ReplyDeleteThanks :) I haven't bleached yet but before you bleached did you find patches of pine were grey? I have removed the varnish and sanded I'm hoping the bleach will make a more uniform colour!
DeleteI didn't find that on mine. It might be water staining? Hopefully the bleach will lift that out too. Go for it!
DeleteWell tried a middle section, bleach really worked a treat but still grey patchy bits, so my advice to anyone else in the same situation is sand sand sand and get grey bits out before bleaching!
Delete